This is default featured slide 2 title

Go to Blogger edit html and find these sentences.Now replace these sentences with your own descriptions.

This is default featured slide 3 title

Go to Blogger edit html and find these sentences.Now replace these sentences with your own descriptions.

This is default featured slide 4 title

Go to Blogger edit html and find these sentences.Now replace these sentences with your own descriptions.

This is default featured slide 5 title

Go to Blogger edit html and find these sentences.Now replace these sentences with your own descriptions.

Monday, July 8, 2013

Hide File in Picture

Hide File in Picture


If you’re looking to hide files on your PC hard drive, you may have read about ways to encrypt folders or change the attributes on a file so that they cannot be accessed by prying eyes. However, a lot of times hiding files or folders in that way requires that you install some sort of software on your computer, which could then be spotted by someone else.
I’ve actually written quite a few articles on how you can hide files and folders in Windows XP and Vista before, but here I’m going to show you a new way to hide files that is very counter-intuitive and therefore pretty safe! Using a simple trick in Windows, you can actually hide a file inside of the JPG picture file!
You can actually hide any type of file inside of an image file, including txt, exe, mp3, avi, or whatever else. Not only that, you can actually store many files inside of single JPG file, not just one! This can come in very handy if you need to hide files and don’t want to bother with encryption and all that other technical stuff.

Hide File in Picture

In order to accomplish this task, you will need to have either WinZip or WinRAR installed on your computer. You can download either of these two off the Internet and use them without having to pay anything. Here are the steps for creating your hidden stash:
  • Create a folder on your hard drive, i.e. C:\Test and put in all of the files that you want to hide into that folder. Also, place the image that you will be using to hide the files in.
hide file in jpg

  • Now select all of the files that you want to hide, right-click on them, and choose the option to add them to a compressed ZIP or RAR file. Only select the files you want to hide, not the picture. Name it whatever you want, i,e. “Hidden.rar”.
add to archive

  • Now you should have a folder that looks something like this with files, a JPG image, and a compressed archive:
hidden rar

  • Now here’s the fun part! Click on Start, and then click on Run. Type in “CMD” without the quotes and press Enter. You should now see the command prompt window open. Type in “CD \” to get to the root directory. Then type CD and the directory name that you created, i.e. “CD Test“.
cd test

  • Now type in the following line: “copy /b DSC06578.JPG + Hidden.rar DSC06578.jpg” and press Enter. Do not use the quotes. You should get a response like below:
hide files in jpg

Just make sure that you check the file extension on the compressed file, whether it is .ZIP or .RAR as you have to type out the entire file name with extension in the command. I have heard that some people say that they have had problems doing this with a .ZIP extension, so if that doesn’t work, make sure to compress to a .RAR file.
And that’s it! The picture file will have been updated with the compressed archive inside! You can actually check the file size of the picture and see that it has increased by the same amount as the size of the archive.
You can access your hidden file in two ways. Firstly, simply change the extension to .RAR and open the file using WinRAR. Secondly, you can just right-click on the JPG image and choose Open With and then scroll down to WinRAR. Either way, you’ll see your hidden files show up that you can then extract out.
winrar

That’s it! That is all it takes to hide files inside JPG picture files! It’s a great way simply because not many people know it’s possible and no one even thinks about a picture as having to the ability to “hide” files. Enjoy!

How do i set up log off,shut down , restart in windows time setup

How do i set  log off,shut down , restart, Sleep in windows System  time setup

Before Application Run

After Application logoff time set 


Click Here to Download  System Timer


Friday, July 5, 2013

How can I open an .MDF file in SQL Server? (Attach Tutorial & Troubleshooting)

Let’s say someone wants to give you their SQL Server database. Maybe they want you to manage it, troubleshoot it, or learn from it. So they hand you a .MDF file and .LDF file and tell you that you need SQL server 2008 R2 to open them. So you

install SQL Server 2008 R2 Express (which, to your relief, is free). You open SQL Server Management Studio(SSMS), and you try to open the .MDF file. You get the following error:


There is no editor available for 'C:\Temp\MyDatabase.mdf'. Make sure the application for file type (.mdf) is installed.
The Solution:

.MDF files are SQL Server database files and .LDF files are the associated log files. But you can’t really “open” them. Instead, you have to “attach” to them. Once you attach, you’ll see the database in the object explorer of SSMS.
If you’re thinking, “Why wasn’t the Backup and Restore process used instead of passing around these database files?” It’s a valid question, but it doesn’t help the reader staring at .MDF and .LDF files with no clue how to access them. However, if you need to move a database around, you should do a search on “backup restore attach detach sql server” (without the quotes) in your favorite search engine. You’ll get lots of opinions to help you decide the best approach.

How to Attach in a Perfect World:


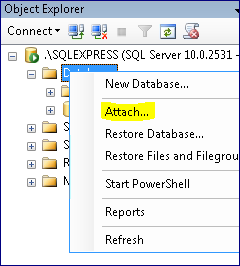
Click here to watch a video on this...

There’s a couple of different methods. I’ll give you the “easy” way through SQL Server Management Studio (SSMS) and then point you to other methods using T-SQL queries.
Launch SSMS.
Connect to your SQL Server Instance.
Right-click on Databases in the Object Explorer.
Click Attach.
In the Attach Databases window, click the Addbutton.
Navigate to the directory containing the .MDF and .LDF files.
Select the .MDF file, and press OK.
Press OK again to attach the database.

You should see the database appear in the Databases node (press F5 if you don’t). You can now explore the data using SSMS. These same steps are documented in the MSDN here. I’m just summarizing to make it easier for you.

There are two ways to accomplish the same thing in a T-SQL script. First, you can use thesp_attach_db stored procedure. This is shown here. Or you can use the CREATE DATABASE command with the FOR ATTACH argument.
So, the World isn’t Perfect

If your database is successfully attached, then stop reading and go use it. But if you see any errors or unexpected behaviors, I’ll try to share some troubleshooting suggestions.

First, you may get a generic error like the following..


An error occurred when attaching the database(s). Click the hyperlink in the Message column for details.

You might be asking, “Where’s the hyperlink?” I’ll show you in the next screenshot (circled in red), and it will also be our first example.
1. Access Denied:
Attach database failed for Server ###. (Microsoft.SqlServer.Smo) Unable to open the physical file “####”. Operating system error 5: “5(Access is denied.)”. (Microsoft SQL Server, Error 5120)

This access denied error could have a few different causes. Basically, you don’t have the required access to the .MDF or .LDF files. This can happen if you get the file from someone else. When they detach the database file, the file permissions are changed to give only that user full control. Also, even if you see that the file has full control for the Administrators group, it may not be enough. Remember in Windows 7/Vista, those permissions are often only realized when you’re running an application as an Administrator.

So here are several choices to fix it:
The easiest solution is to close SSMS and then run it as an Administrator. Perform the attach as an Administrator, and it’s likely going to work.
Another solution is to explicitly grant full control to the .MDF and .LDF files to your user account. This can be done by right-clicking the files, selecting Properties, and modifying the Security tab.
A final solution is to copy the files to the default directory for your other database files. To find out what that is, you can use the sp_helpfile procedure in SSMS. On my machine it is: C:\Program Files\Microsoft SQL Server\MSSQL10_50.SQLEXPRESS\MSSQL\DATA. By copying the files to this directory, they automatically get permissions applied that will allow the attach to succeed.
2. Access Denied Variation 2

There is another variation of the Access Denied message that has a simple solution:


Failed to retrieve data for this request. (Microsoft.SqlServer.Management.Sdk.Sfc) CREATE FILE encountered operating system error 5(Access is denied.) while attempting to open or create the physical file '####'. (Microsoft SQL Server, Error: 5123)

This error means that the file is already opened exclusively by another application. The most likely cause is that this database file is already attached to an instance of SQL Server. Double-check your list of databases to see whether it is already in the list. It’s also possible for applications to use .MDF files directly with a feature called User Instances. If an application is using a .MDF file in this way, then it would have to close before you could attach the to that database file.
3. Database is Read-only
This is not so much an error as an undesired result. When you load the database, it is in a read-only state. You can tell by the gray shading of the databasee icon (not to mention the “Read-Only” label next to it).


The most probable cause is that the .MDF file you attached to is read-only. Just right-click on the .MDF and .LDF files, select properties, and then uncheck the Read-only check box.


4. Unable to Downgrade

The next error happens when you try to attach a database of a higher version of SQL Server (like SQL Server 2008 R2) to a SQL Server Instance of a lower version (like SQL Server 2005).


Attach database failed for Server '####'. (Microsoft.SqlServer.Smo) An exception occurred while executing a Transact-SQL statement or batch. (Microsoft.SqlServer.ConnectionInfo) The database '####' cannot be opened because it is version 661. This server supports version 655 and earlier. A downgrade path is not supported. Could not open a new database '####'. CREATE DATABASE is aborted. (Microsoft SQL Server, Error: 948)

This has never been supported. You can attach a database of an older version of SQL Server to a newer version, but you can’t go the other direction. If you want to verify the version of SQL Server you’re running, see this post.
A Parting Word on Detach:

This post is just covering the scenarios of, “How do I open this .MDF file” and “Oh, I have to attach it, why am I getting errors?”. But how were these files obtained in the first place? The answer is that there is a corresponding Detach feature in SQL Server. You can find it by right-clicking on the database in SSMS, selecting tasks, and looking for Detach. Before you do this, though, run the sp_helpfile procedure in a query window in the context of your database. This will tell you *where* the detached .MDF file will be located. After you’ve detached the file, you can attach it to any SQL Server instance. Although this post was about Attach, I think it’s worth mentioning this for completeness.

How to Improve our Resume

In a slowing economy, you may need an effective resume to help you to obtain a telephone or in person interview. You may only have one chance to have your resume read by a given employer, so you may want to make a great impression the first time.
These tips, which cover how well your resume reads, looks, and presents relevant content, will help give you the best possible opportunity to land an interview, the next step you’ll need to complete to secure a position.
  • Objectives section. Some potential employers will tell you that a clearly written objectives section which shows how your skills and experiences map to the employers needs is ‘critical’ to gaining an interview. Other individuals, such as the original writers of this article will tell you If you have an Objective section, delete it. It rarely helps and can easily hurt you by needlessly pigeonholing you. Thus, you, the job applicant need to decide if you should have an objectives section. If you do have such a section, please be 100% sure that the section clearly maps your skills and experiences to the employers needs. A section simply stating: Seeking entry level position where I can learn… will not help you.
  • Keep the Skills section clear, brief and concise, especially on a technical resume. Hiring managers will usually skip it because they’re more interested in seeing your skills in context, which is in the bullet points of your Experience section.
  • For some positions, experienced employees may wish to place their Education section at the end of their resumes, where some hiring managers look for it. If you’re a recent graduate without extensive work experience, you should plan to put it at the top. If you have had more than one career relevant professional position, you need to consider the relative importance of your job experience vs. your academic experience in deciding where to place the Education section. If applying for an academic job, the Education section should, most likely, always remain at the top of your resume.
  • Use as few pages as possible (the actual length will depend on your profession). Extraneous information will divert attention from the heart of your resume. Be objective when deciding what information is truly relevant to the hiring manager. 1-2 pages is a great target for many non-academic resumes.
  • Do not mix future and past tenses. Bullet descriptions for your current job should be in the present tense (unless it’s describing a completed project) and descriptions for past jobs should be in the past tense.
  • Be consistent in your formatting. Do not bold one job title and italicize another. Do not italicize one former employer’s name and underline it for another. Pick a single style for each element and stick with it. If you make changes, check to make sure the changes are done consistently across the board.
  • Choose a clean, subtle font that’s easy to read and look at. For example, Garamond is a crisper, more refined font than Times New Roman. Also, make certain to choose a font that most PCs and Macs will have installed. See this list of fonts common to most PCs and Macs [1]. TIP: If you choose an uncommon font, you can save your file as a PDF and embed that font in the PDF document. You should also choose your font based on how your resume will be presented; sans serif fonts like Arial are best for viewing a resume on a monitor, where serif fonts like Garamond look better when printed on paper.
  • To increase readability and comprehension fine-tune your spacing. Studies have shown that maximum reading comprehension is attained when spacing is set at around 1.15x of the font size. For example, an 11 point font should have 13 point spacing. TIP: To automatically adjust line spacing in MS Word, select the text you want to adjust, then go to Format > Paragraph… Then, in the Paragraph window, change ‘Line Spacing:’ to ‘Multiple’ and then set ‘At:’ to 1.15 (you can tweak this number a bit if you are having trouble fitting a resume onto 1 or 2 pages). This method will give you perfect spacing regardless of what font size you choose.
  • Convert your resume to PDF format. Many potential employers require that your resume and cover letter be emailed or uploaded in PDF format. PDF stands for Portable Document Format; this type of document is widely requested because it maintains its appearance both on-screen (of nearly any computer) and in print. Documents may be saved in PDF format from many editors including Microsoft word. One might also buy Adobe Acrobat software or other conversion software such as Tweak Word To PDF 3.0. To start the conversion, you can either from the converter or from the file by the button.
  • Information on a resume should be listed in order of importance to the reader – your strengths, accomplishments should come first. Title/Position is most important so always list that first, then Company, Location, Dates.
  • Create a personal branding statement that describes who you are, your greatest strength, and what benefit you bring to your future employer.
  • Identify what makes you uniquely qualified for a position – a qualifications summary can catch a recruiter’s eye and get them to read more carefully.
  • Keep it short and pithy to catch a recruiter’s eye.
  • Use strong concrete verbs to describe what you did.
  • Use a bulleted, easy to read format rather than a paragraph style. It will make your strengths stand out.
  • Write your resume for the job you want – highlight past skills and experience that fit what you want to do.
  • Keep it to 2 pages, maximum.
  • Make your resume accomplishments driven, not responsibilities driven. Quantify wherever possible.
  • Focus on the last 10-15 years of experience; you don’t need to list early jobs unless they show skills and achievements that apply to the job you want – then only include those key facts.
  • Put jobs in reverse chronological order – most recent first.
  • Don’t put anything on your resume that you did not personally do.
  • Use a clear font – like Arial/Times New Roman/Georgia at an 11 point size. Avoid fluff, extra words, run on descriptions, and redundancy. Keep it clean and easy to read.
  • Include you education – school, program, any relevant classes that directly relate to the position you are applying for.
  • Be sure that any jargon you use in your resume is common knowledge. For students – if you are part of campus organizations you may need to explain more than just the name. For tech workers – make sure you use all acronyms consistently – don’t use UNIX and later Unix.
  • Do not use italics, script, shading, colors; do use bold and indents sparingly.
  • Do not use internal product names, use descriptions but make them brief.
  • Spell check your resume by printing it and reading it aloud. Have a friend proofread it to catch any mistakes you may have overlooked.
  • Edit and format carefully. You can even hire someone to do it for you, it’s worth the expense.
  • Name drop – if you worked with major customers include their names and how you supported those customers.

Resume Words

Achieved Analyzed Assembled Awarded Certified Composed Controlled Coordinated Created Delivered Designed Developed Devised Directed Educated Established Exceeded Founded Fully Credentialed Implemented Improved Increased Leadership Managed Minimized Monitored Negotiated Operated Organized Originated Oversaw Owned Prepared Problem Solving Programmed Published Reduced Reorganized Researched Reviewed Saved Simplified Supervised Tested Trained
Oral / Written Communications

Core Resume Components

  • Contact Information – name, address, phone number and email address. Include certification logos in the upper left or right corners.
  • Skills Summary/Branding Statement/Objective – The skills summary is recommended for experienced professionals. Branding statement is recommended for mid to senior level professionals with specific strengths companies are looking for. The objective statement is better suited for recent graduates.
  • Work Experience – Show progression and promotions. List titles, company name, location and dates
  • Education and Training – List highest degree first. Include continuing education.
  • Skills – Incorporate throughout resume. Resume should reflect the skills listed in the summary.
  • Activities – List only those activities that are relevant to the target job and non-controversial.
  • Organizations – relate affiliations in terms of marketable skills, knowledge and achievements.
Honors/Awards – Add only if relative to work, otherwise do not include. Technical certifications can be included here